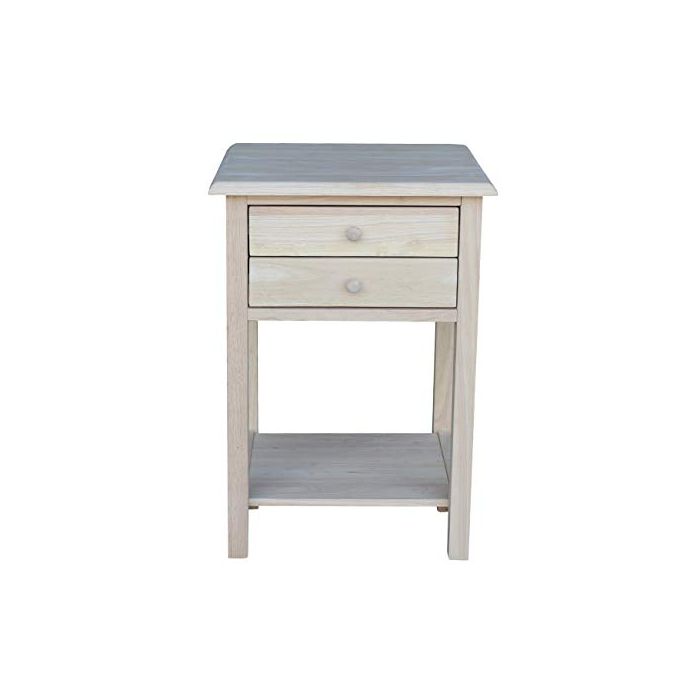
International Concepts Lamp Table, Unfinished & Accent Table, 14 L x 16 W x 20 H inches, Unfinished
From the manufacturer
International Concepts OT-92 Lamp Table, Unfinished

Parawood Facts:
- Scientific Name: Hevea Brasiliensis
- Durable
- Hardwood
- Easy to finish
- Density: 7+ (Birch: 7, Ash: 8)
- Strength Group: B6 (same group as maple)
- Plantation grown to promote ecological balance
Product Specifications
Dimensions
12.9in. W x 12.9in. D x 25.6in. H.
Features
Made from solid parawood; size of lower shelf: 13.99"w 13.20"d; distance from floor to bottom of lower shelf: 3.15; distance from top of lower shelf to bottom of drawer: 12.81; inside drawer dimensions:12.29 "w x11.27"d x 2.76"d.

Finishing Instructions
Congratulations on your purchase of 'ready to finish' furniture. We want to give you some help that will enable you to achieve good results and pleasure in your finishings project. Your furniture is part of natures handwork. Every item has its own unique grain pattern and color. Dark grains and knots are a part of the character of wood and were put there years ago by the tree branches and the twisting of the wind, which causes trees to bend. All of which affects the outcome of every tree. Each piece of solid wood furniture is an original. Light and dark areas all blend during the finishing process. There are numerous products available for you to finish your furniture. Ask your local merchant to help you in product selection based on your particular needs.
Our desire is to assist you in achieving a beautifully finished piece of furniture. The following tips are to help you accomplish this goal.
First and most important is to read and follow the directions of your finishing material. The finish manufacturer really does know his own product, read finishing directions completely. Take your time to finish, remember don’t rush – it may take a little longer, but you will be proud of the results.
Surface preparation:
Although all pieces are sanded, they will need additional 'finish' sanding. Check all surfaces for minor splits, chips or dents. Sand or fill with wood filler. Make sure the residue from the filler is sanded smooth. Start sanding with medium sand paper (#120) and then finish with fine (#220) sandpaper. Check all surfaces. If an item has any frizz or roughness, it will show when staining, and you may not be satisfied with the end result. Never skip the initial sanding of all parts. Wipe the furniture using a tack cloth (available at paint & hardware stores) to remove all the dust created by sanding.
Staining:
Be sure stain is stirred throughly. Some stains have a heavy pigment on the bottom of the can. It is not uncommon to take up to five minutes to make sure the 'mud' is dissolved. This keeps the stain color consistent from the top of can to the bottom. As you are staining, periodically stir the stain to keep it from settling to the bottom. We recommend doing a 'doodle' area on the piece first in some inconspicous location (under a seat or table top). This will allow you to check stain color before proceeding. When you have completed your first coat of stain and have allowed it to dry, wipe a coat on clear finish on your 'doodle' area. If you like the finished 'doodle' and feel the color is fine. One coat is adequate if the stain is too light or uneven, a second coat of stain may be needed and a second test 'doodle' using 2 stain coats is recommended.
Application:
You can almost use any type of rag, cotton works best, approximately 10” square. (larger rags sometimes get in the way). Stain one surface at a time and do the harder areas first. There is no particular motion to applying the stain we recommend to do cross grain first and then with the grain.
As you stain each area, wipe excess stain off with the grain, then move to another area, as you finish go backover the entire piece with a clean rag to wipe up all excess stain.
Top coat:
The clear top coat may be wiped or brushed on. Wiping seems to prevent runs. Again, do small areas at a time. We recommend applying topcoat with the grain, however, you may find it necessary in some areas to apply gross grain, make sure the final wipe is immediately with the grain.
Allow the top coat to dry. The surface will appear gummy if not dry, drying time will vary depending on weather conditions, sand with very fine (#220) or #600 wet/dry sandpaper, this removes the fuzz. Wipe with a tack cloth after sanding to remove debris. Feel the entire piece with your hands, if it still feels fuzzy, smooth out before applying additional coats. The fuzz will not go away and will remain until you take care of it, you are looking for consistent sheen. If after two coats you are happy with apperance you are done. If you have an uneven sheen, apply additional coats, always sanding lightly between coats. If water resistance is a goal, we recommend four layers of top coats, apply at least one coat of stain or clear finish to all surfaces of solid wood. Even if it is not seen, this prevents cracking as the piece continues to dry out over a period of years.
Remember to read finishing product instrucitons completely and take your time.